
Tuesday, March 31, 2015
Watercolor Easter
Sunday, March 29, 2015
Pastel Easter
 I could just see this girl in the stores shopping for those perfect little gifts to give her friends for Easter. She said, "make me pastel" so I did. I wanted a water colored FREE look so using my aqua painter I opened up my Pool Party, Crisp Cantaloupe, Pistachio Pudding and So Saffron inks and began adding puddles of color to the watercolor paper. Then I cut a piece of our window sheet and using the Stazon Black Ink I added her image and then began to surmise how I would adhere her to the paper. Finally, I cut a dimensional in half and stuck it to her purse and the stamped a purse onto the Shimmery White card stock which I also used for the base of the card, colored it, fussy cut it and adhered it to the window sheet with a glue dot. It still slid around a little, so I added the banner piece, which I colorized in the same way as the main piece, use a glue dot on the left side to adhere it to the window sheet and then stacked 2 dimensionals on the right side and wala--stuck perfectly!
  I added Basic Pearls to give her chic buttons on her coat and purse.
Saturday, March 28, 2015
Painted Petals

Flowers signify new beginnings and God's art does not disappoint. The concept artist that created this paper has to be a lover of nature like me and I am grateful for their talent and willingness to share their ability to recreate such beauty.
The sentiments in this set are so true to how I feel and the fonts used are wonderful. They make this set timeless and another keeper for my collection.
Friday, March 27, 2015
What's It All About
It's been just over 3 weeks since I began this blogging journey. I've made a lot of cards, thought about making more and continue to wonder...what's it all about?
I had a great day creating in my lair today. The mood was right, I felt good, and my imagination beckoned to me to "just start!"
My organization of my projects is a little like my life, in general. I just go. I follow what's in my heart and trust I'm heading in the right direction. Some days I look at what I've created and wonder, what the heck? Today is not one of those days. The sun is shining, it's cold outside, and it's perfect for opening myself up to the creative side of this girl.
I remember thinking to myself, when I began this stamping trip so many years ago, why? What's it all about? Why are you drawn to this?
I think it's quite simple. It brings me peace. I find a place to be within myself that is not always that easy to uncover. The product of my peace is what you see as you peruse my creations, one after the other.
It is my hope, that as you come back to my blog that you, too, will find something within yourself that gives you peace. Maybe it will be stamping, maybe not, but whatever it is, I hope you find it.
Thursday, March 26, 2015
Butterflies and Bling

Have a groovy stamping day!!
Wednesday, March 25, 2015
Kinda Eclectic

I offset the larger stamped whisper white and blinged it in the background with the Dazzling Diamonds Glimmer Paper. I used the 3/4" Circle Punch to add some pizzazz to the burst of color and as you may have caught on by now, I added the butterflies 'cause they're one of my favorite things to punch and enjoy in life.
The 3/4" Crushed Curry Chevron Ribbon took my card to a new level and the Rhinestone popped it up even more. Such a fun card to make!!
Tuesday, March 24, 2015
It Is Girls Night Out Tonight!!
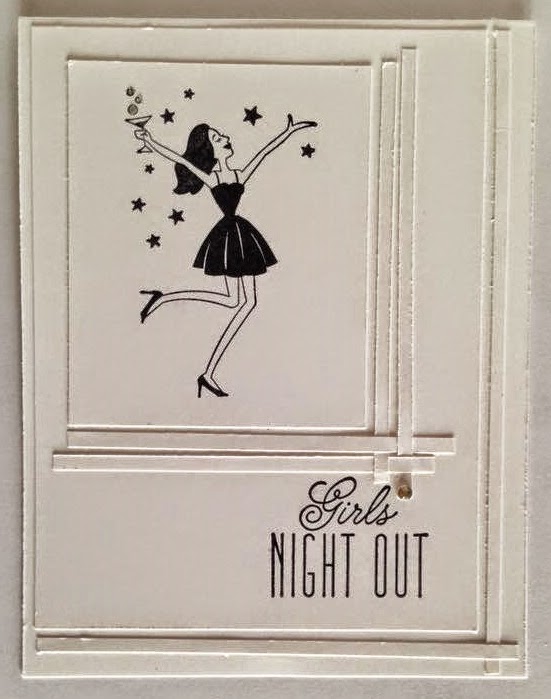
And although I look nothing like this girl, she seems to be channeling my inner-self as she dances around celebrating---whatever. For whatever reason, when I was putting this card together, something spoke to me and said, "weave", so I did:)
Have fun creating with this set and send me what you come up with. Have a great Tuesday!
Monday, March 23, 2015
Coffee Rules
 |
| The Perfect Blend
The one thing I've learned is that "I LOVE MY MORNING COFFEE"!!! It is part of my morning ritual as I gather my mind and figure out my day. When I saw this stamp set for the first time (in the 2014 Occasions Catalog, I thought...I have to have that. So, among all of the other must haves I actually acquired this set when the Annual Catalog came out almost a year ago. Every time I see someone else's creation I just melt and think...I'm in love all over again:)
So, anyhoo, here is my latest creation with this stamp. I combined it with two other favorites of mine, Kinda Eclectic and Gorgeous Grunge, along with some Dazzling Diamonds Glimmer Paper and inked everything in Lost Lagoon.
Hope your Monday has gone better than you planned and that tomorrow is amazing! Thanks for stopping by.
|
Sunday, March 22, 2015
Easter is Almost Upon Us!!
 I saw this adorable bunny on Splitcoastampers and knew I had to try making it!! Thank you Susan Campfield, for your creativity and sharing your video and instructions. The thing I love about this project is not only this cute little bunny, but also the little basket he rests in. This Berry Basket is cut from a Bigz Die available in the Occasions Catalog and is super, super easy!
I will tell you, that when you cut this basket out, it is recommended to use the Premium Crease Pad. I followed this instruction and some of the cuts didn't go all the way through. So I set the Crease Pad aside and used the clear cutting mats and it cut perfectly. ALL MACHINES CUT A LITTLE DIFFERENTLY, SO IF ONE WAY DOESN'T WORK, TRY ANOTHER.
 I used the large cellophane bags (6" X 8") for the candy and his bow is made from the Crushed Curry Chevron Ribbon, cut to 11".
  The pink card stock is Blushing Bride and the DSP is Best Year Ever, available in the Sale-A-Bration Catalog
 Contact me today for further instructions. I'll be happy to share all the details.
 Saturday, March 21, 2015
Crystal and Diamonds


The little critters in this stamp set just make me smile. In addition to this chick in this stamp there is a rabbit and a bear. Check it out in the Occasions Catalog. This has become one of my "favorite" sets very quickly. The nice thing is it a multipurpose set, not just made for Easter.
I colored the chick's shirt with Pear Pizzazz to coordinate with the egg using the Ovals Framelits. I added crystal effects after coloring and also coated his sign in crystal effects. I really like Easter Eggs with bling so using the Crystal Effects again, I added a layer of that before pouring on the Dazzling Diamonds glitter.
The silver metal button is so nice. I have looked at embellishments elsewhere and to be honest the quality of what I can get from Stampin' Up! is yet another reason I do what I do. I modified the silver ribbon to form this star burst and then tied on a silver bow. I sponged the background DSP, Irresistibly Yours prior to adhering my button bling and I'm done.
Friday, March 20, 2015
Butterflies and Feathers
Lovely Amazing You. Here is that set again. I LOVE IT. CAN'T GET ENOUGH OF IT:)

My editing skills do not do this justice. Editing is definitely a work in progress. This card is very pastel, again using the Pear Pizzazz and So Saffron Inks sponged onto the background DSP, Irresistibly Yours. The feathers are from this same set and they're stamped in Crumb Cake, Soft Suede and Early Espresso. I fussy cut them and then glued them with the Multipurpose Glue and applied a bow made from the Linen Thread and applied with a Glue Dot. The butterfly is cut from the Beautiful Wings Embosslit and sponged with So Saffron Ink.
I love that it's almost Spring because I love new beginnings and soft colors. Enjoy making your version. I'd love to see what you come up with!!
Thursday, March 19, 2015
Lovely Amazing You and Butterflies
When I sat down to make this card I wanted something elegant, pastel, and most of all I wanted to use the little envelope in this stamp set. It is so adorable! I'm so in love with the Irresistible Yours DSP that I just had to use two of the patterns instead of just one. I sponged with Pear Pizzazz and So Saffron on part of the paper and left some white. Once again, adding butterflies using the Sizzlit Beautiful Wings gave that bit of pop and bling that this card was crying for.

The sentiment on this card has a close place to MY heart as my grandson, Eli, came up to me when he was 2 and said this very thing. He's now 5 and I will cherish that moment all of my life!
Wednesday, March 18, 2015
Why Do You Do This?
Not sure that I can do this, but I'm going to try to tell you why I do "this", all in a neat little nut shell. By "this" I mean stamp, blog about stamping, show others they can do "this" too.
Have you ever felt like you're living your life from one day to the next doing the same thing over and over again, always looking for the day when you finally get to where you always dreamed you would be? Have you overlooked "the moment" because you're thinking about that place you really WANT to be?
That is SOOO what I did for so many years. I'd get home from work, get the girls off to school, sleep a little, volunteer, pick the girls up from school and head to all those activities that we want our kids to immerse themselves in so they can have an idea of what they want to do when THEY grow up, grab a bite to eat on the way home to get ready for work, head to the hospital to meet the moms and dads of the new little people I was helping bring into this world, head home after a full night, and then do all of it again the next day.
Don't get me wrong, I love being a mom. I absolutely love being a nurse. I'm in serious love with my husband of 36 years. BUT I WAS TIRED OF THE RAT RACE. I just wanted to stop and smell the roses. I wanted the opportunity to figure out what I was all about, what I wanted now, what I wanted then, and how I wanted to get there.
So in 2003 I went to my first Stampin' Up! workshop that my daughter invited me to, not because I was interested in stamping, because I truly had no idea what stamping was, but because I wanted to support Christa. But after making my first card, I was entranced. I had no idea I could make something so cute. It was at that time that I realized there was more to life than just going through the day to day routine. Weird, huh?
I later joined my sister's stamp club and enjoyed getting together every month with women I hadn't known before I started this stamping adventure. As you can imagine, one thing led to another, and then in 2005 I signed up as a demonstrator. I just wanted the awesome special that was being offered. But then I wanted to help reimburse our household money that I had spent on the kit with money that I could earn from bringing stamping to other people. And that's it...in a nutshell. The journey began almost 10 years ago, and it's still going strong today.
I love the opportunities I've had to meet new people, travel to places I've never been before, and learn to enjoy "the moment" in all its glory.
Life is about making memories, giving back to make this world of ours a better place, and taking ALL of it in, one step at a time.
Join me on my journey and let me know what brought you here to my blog. What's your life like? Have you ever stamped before? What's your profession? Are you a work at home mom or dad? Do you fly planes? How do you enjoy your moments?
You Made My Day

Today's project is again using the Best Day Ever stamp set and I used Night of Navy and Calypso Coral for my colors as they coordinate wonderfully with the Birthday Bash Designer Series Paper. The bling is found in the Annual Catalog on page 208. Check out my list below for all the supplies I used.
Tuesday, March 17, 2015
Best Day Ever

Monday, March 16, 2015
Faux Metal Technique Compliments Irresistibly Yours
Have you seen it? Do you have it, yet? If not, HURRY because it leaves us when Sale-A-Bration ends. I'm talking about the Specialty Designer Series Paper, Irresistibly Yours. It makes my heart happy every time I sit down to design a project. There are several ways to use it, which is another reason I hope we see more DSP like this when our new catalog comes out this June. Here is my card for today. Mondays are so hard sometimes, but this woke me right up, and I can actually say this Monday is a good day:-)
 One of the techniques I learned years ago, was how to do faux metal. This is a take off from that, as normally for the "metal" part of this technique you would use gold, silver, copper...you know...metal finish colors...Nevertheless, the technique is the same. You start by stamping your image in Versamark Ink, and I chose the Pool Party Embossing Powder (EP) for this project. Apply the EP to your inked image and emboss as normal with your heat tool. Allow the melted powder to dry and add another layer of Versamark Ink, EP and reheat. Do this a third time and this time, while the melted EP is still wet press your stamp into it, letting it set for a few seconds and then remove your stamp.
This year I have gravitated to our blues when I stamp. I love the Bermuda Bay and Pool Party hues, so I sponged in these two colors to glam up the star sheet of the Irresistibly Yours DSP. Be sure to wipe off the pre-embossed stars with a paper towel to make them really pop! Adding the Bermuda Bay Sequins for this balloons string was the icing on this cake. The little gold bow from the Balloon Framelits set is so cute. I popped the balloon up with 5 dimensionals and secured the strand of sequins with glue dots.
Hope you have enjoyed this project. If you would like to try your own here's my supply list:
Sunday, March 15, 2015
CASE This...I DID:)

Saturday, March 14, 2015
Lotus Blossom Begs for All Color Combinations

Friday, March 13, 2015
Pom Poms are Adorable

Thursday, March 12, 2015
What's Up ?

I chose to sponge this 3 1/2" X 4" piece of DSP with Coastal Cabana, Pool Party and Lost Lagoon Classic Ink. Then I punched the sentiment using the Mosaic Punch and edged with my Lost Lagoon sponge to frame this piece. I colored and then punched the little house and punched the arrow from the Dazzling Diamonds Glimmer Paper. I cut the punched arrow in half and then glued it to the DSP and popped my sentiment up with Dimensionals. To add a little more bling I used our rhinestones and I think this card turned out really cute!
Here's my list of supplies:
Wednesday, March 11, 2015
Paper Pumpkin Celebrates!!!
Paper Pumpkin is 2!!
 If you want to "try" crafting before you dive in altogether, Paper Pumpkin is the perfect place to start!! You get a different kit every month and a prepaid subscription is on sale through March. Check out this FAQ PAGE for answers to your questions and join today:)
If you want to "try" crafting before you dive in altogether, Paper Pumpkin is the perfect place to start!! You get a different kit every month and a prepaid subscription is on sale through March. Check out this FAQ PAGE for answers to your questions and join today:)
Gifts for Friends

I used our new photopolymer stamp set, Lotus Blossom, and stamped with Melon Mambo, Rose Red and Strawberry Slush Classic Inks on Whisper White Card Stock (4 3/4" X 1 7/8"). Believe it or not, the Strawberry Slush was the darkest pink and the Melon Mambo was the lightest one:)
I stamped the stem in Mossy Meadow, stamping off for the lighter green. The black is stamped with Memento Tuxedo Black Ink and I embellished with rhinestones, punched my Melon Mambo Card Stock (5 1/4" X 2") with the Scalloped Tag Topper Punch and added the Organza Ribbon. Done. Simple, yet elegant. Have fun making your own!! See you tomorrow with a new project.
Check out the list below for supplies:
Tuesday, March 10, 2015
Just Kidding
 This set is a must have in my collection!! Check out the other stamps in this set at this link: The Newest Photopolymer
Bye Bye Blendabilities

I learned today that our new found love, The Blendabilities Markers, will no longer be available. I am attaching a link that was supplied to all demonstrators, and I feel, that whether you're a demonstrator or a customer viewing my blog, you need to watch this video. It was a very difficult decision for Stampin' Up! and although I am saddened, I am grateful that not only is Stampin' Up! making sure that the business stays true to their quality form, they are also making sure that we as demonstrators and customers continue to receive the quality products that we all love. So, without further ado, please click this link to watch the video: Blendabilities Video Link
Life is A Happy Thing

The card I'm sharing today is using two of my favorite tools...the Blendabilities and the Big Shot Framelits. I have no idea how I ever stamped without these things.
In this 'Thanks' card I used a base of Whisper White (WW) card stock cut to 4 1/4" X 11", scored in half. I then cut another WW piece to 1 3/4" X 3" and stamped in Memento Tuxedo Black Ink and colored the lemon from A Happy Thing stamp set, which if FREE through the end of this month, with a qualifying purchase. I used the Daffodil Delight and Old Olive Blendabilities. If you've never used the Blendabilities, or as I like to call them, "the blends", watch THIS VIDEO FROM STAMPIN' UP!
I layered my stamped piece onto a Hello Honey piece of card stock cut to 2 7/8" X 4 1/8" and then I cut a piece of Coastal Cabana 3 3/4" X 4 1/8" and ran it through my Big Shot using the Large Polka Dot embossing folder. I glued all the layers together with Multipurpose Liquid Glue and then added my accents...the Bitty Butterfly and the 'Thanks' which I punched and cut from the Dazzling Diamonds Glimmer Paper.
Thanks for coming to see me. Let me know what you think:)
See my list of supplies below.
Monday, March 9, 2015
Sale-A-Brate With A Mini Treat Bag

When I saw the Mini Treat Bag Thinlits Dies they were to "Die" for! Not only do you get the pieces for the cute little bag, you get SOOO many more! Check this out: Mini Treat Bag Video from Stampin' Up!


I'd love to know what you think about this project! Happy Stamping.
--Tammie
Sunday, March 8, 2015
Sale-A-Brate with Lotus Blossom

Have fun today stamping! You're amazing!
Here is a list of the supplies I used:
Saturday, March 7, 2015
Do More of What Makes You Happy


When I finished with the card I needed an envelope that fit this big boy. I pulled out my Envelope Punch Board, found my card size and got to work. To decorate the envelope I did more embossing and cut a banner using the Gold Glimmer Paper. I sealed the envelope with Sticky Strip and finished it off with a little punched gold heart.
If you have never used an Envelope Punch Board, check out this video provided by Stampin' Up! to learn more.
Check out the list of supplies below. Contact me with any questions. I would love to talk with you!
Have a wonderful stampy kind of day!!
Friday, March 6, 2015
Butterflies and Hearts

I love the cards that look elegant and that are so easy to put together. I also love that it's Sale-A-Bration time and I could create with some of the FREE things I was able to acquire, from the Irresistibly Yours designer series paper to the cute stamp set, 'A Happy Thing'. The pops of blue from the sequins available in the Occasions Catalog just finish this design. I sponged the dsp and butterflies with Melon Mambo, Calypso Coral and Crushed Curry Classic Ink. I accented the sentiment with Bermuda Bay, by stamping off once and then applying to the card stock. I really love the way the Happy Heart Embossing Folder just adds to and brings together the design I had in mind. So fun!!
Thursday, March 5, 2015
 |
| Masking I watched Bonnie (Thurber) Farley demonstrate how to do this technique and thought...I could do that... so I found a piece of very thin paper, stamped my image, cut it out, and began making this cool card. Click HERE to watch the video and start creating. For my card I used a Whisper White card stock base cut to 5 1/2" X 8 1/2". I cut another piece of Whisper White to 4" X 5 1/4" and ran it through my Big Shot using the Perfect Polka Dots Textured Impressions Embossing Folder. I adhered that to my base card and then cut my piece to stamp (you guessed it...Whisper White) measuring 3 3/4" X 5". The masking was easy peasy and the coloring was so much fun. I used the Daffodil Delight and Old Olive Blendabilities after stamping with Memento Ink. To embellish I punched the Bitty Butterfly from Glimmer Paper and added the Rhinestones colored with the Blendabilites. Don't you just love life? Check out the supply list below for this project. |
Painted Blooms

Not long after the Occasions Catalog went live, a wonderful demonstrator, Patty Bennett, showed how to make 6 cards from this one sheet of 12" X 12" DSP (designer series paper). Of course I had to make it. In fact, I made all 6...
Here's what you do:
Cut 3/4" off the top and the bottom of this sheet of Painted Blooms DSP. Then, cut the DSP in half horizontally and in thirds vertically, so you end up with 6 pieces of flowered paper, each measuring 4" X 5 1/4".
To make this card you'll need 2 sheet of Whisper White card stock, cut to 5 1/2" X 8 1/2". Layer on the Painted Petals Dsp using Snail Adhesive. Cut a piece of the Coastal Cabana ribbon available in the Sale-A-Bration catalog for FREE, 4 1/4" long, angling ends. Using black ink stamp the Thank You sentiment onto Whisper White card stock and punch out. Stick the ribbon on your card using snail and then pop your sentiment up using 2 dimensionals. Finally, to add a little bling to your card punch out 2 butterflies from the Dazzling Diamonds Glimmer Paper using the Bitty Butterfly Punch and attach them with glue dots, after bending their wings up for dimension.
Wala! Beautiful card and EASY!!!!
Head over to My Website to order your supplies now!
Let me know what you think:)
Built for Free Using: My Stampin Blog
Wednesday, March 4, 2015
 |
Bow Builder Punch and the Hello You Thinlit Dies |
To make this card I started with the base, which is Whisper White card stock cut to 5 1/2" X 8 1/2". I created the 2 bows using the FREE Sale-A-Bration designer series paper Best Day Ever after watching the "how to" video on YouTube. Click this link to the video: Bow Builder Punch.
Next, I die cut my "happy' from Coastal Cabana card stock and added my sentiment, Happy Birthday, from the Big Day stamp set, which is also FREE in the Sale-A-Bration catalog, stamped in Calypso Coral ink and then adhered the bows and 'happy' sentiment with Tombow Multipurpose Adhesive.
Feel free to CASE my card. See my list below for product numbers and head over to my Website to order your supplies now.
Whisper White card stock Item # 100730 $8.50 for 40 sheets
Coastal Cabana card stock Item # 131297 $6.95 for 24 sheets
Best Day Ever designer series paper Item # 138633 FREE with qualifying purchase
Calypso Coral Classic Ink Item # 126983 $5.95
Big Day Stamp Set Item # 139112 (clear mount) or # 139101 (Wood Mount) FREE with qualifying purchase
Hello You Thinlits Die set Item # 137363 $24.95
Tombow Multipurpose Adhesive Item # 110755 $3.95
Happy Stamping!! --Tammie
Subscribe to:
Posts (Atom)