Another glimpse of the upcoming In Colors~~When I first saw the new colors, I really wasn't that excited. But I have to admit, now that I have them in my hands, and I'm using them, they are AWESOME!! Oh, and the new RMHC stamp, Sprinkles of Life, so cute! Love that it has a coordinating punch:) The new catty goes live on June 2nd, so keep your eyes peeled. Lots of new stamps, dies, punches and of course, new colors!!!! Gotta love it.
Sunday, May 31, 2015
Saturday, May 30, 2015
Friday, May 29, 2015
Punch Up Those Butterflies and Birds
 I found this card on Pinterest several weeks, maybe months, ago. I absolutely love the subtle colors, as well as this Elegant Butterfly punch. I definitely want to credit the artist, unfortunately when I clicked into their post, it just takes me to an Ebay page from Australia. I changed up the sentiment, but this is basically the same card I pinned, so~thank you for your inspiration from Australia!
When you make your butterflies, punch them first and then "wash" them quickly with your aquapainter and allow them to dry. Then come back and sponge the edges with the same color, to add pop.
This bird-day card is also a Pinterest pin. This card was designed by Carol Payne from carolpaynestamps.com and it is adorable. Her color scheme was different, but same design. Thank you, Carol, for your creativity! I used the Birthday Bash DSP, which I adore, for the hats and punched them using the Small Oval punch. The DSP and Punch are both retiring, but I'm sure I'll find other paper and punches to satisfy me;)
The punches I used were the 1 3/4", 1 3/8" and 1" Circles. The wings on Mommy and Daddy are from the Bird Builder Punch and I just cut triangles for the beaks. Very simple and quick card to make with very "WOW" results. Thanks again, Carol Payne!!
Thursday, May 28, 2015
Silver Hearts and Friends
Good morning! My post today is based on a challenge from Stampin' Up! and I thought, "why not". I've always been chicken to participate because of my innate fear of not being able to rise up to meet the challenge, but I'm done with that way of thinking. To quote a great coach whom I follow, "Nothing worth doing right is easy"--Mike Matheny (St. Louis Cardinals). So I'm just doing it! I love what I do, I want to share what I do, so here it is.
The challenge was to use at least two punches, specifics were given, and post by June 30 on Pinterest. I know, it's way far away from June 30, but procrastinating is not my strong suit. I am getting better at it, but not with this;) The two punches I chose were the Sweet Heart and the Hearts Border Punch. I used the border on the inside of my card, as you can catch a glimpse of it in the first photo and then you see it in all its glory below.
I really like this new stamp set, Friendly Wishes, from the 2015-2016 catalog! I like that the trend these days is BIG sentiments that actually become the focal point of projects. Oh and the Watermelon Wonder...very lovely. I liked it when I saw it, and now I can't get enough of it!!
Tuesday, May 26, 2015
Wednesday, May 20, 2015
Gold and Strawberries
Have you ever imagined something, but until it was close to "just right" in your mind you just couldn't put that idea into reality? You may have noticed I haven't posted anything for a few days, and that's because I had (above) this rolling around my brain, but couldn't get it to the REAL stage. Until now. To give credit where credit is due, I watched a You Tube video by Dawn Griffith and she showed how to make some strawberries, so I set out to do just that. However, I didn't have any of the same tools she used to create her berries, so I had to figure out how to improvise. Here's what I did:
 Using the Floral Framelits Die, 2nd largest, I cut out my strawberry and then embossed with the Perfect Polka Dots EF. I made my leaves from the Pansy Punch and then began to construct my first berry.

 I folded the Real Red Card Stock in half, all the way around. Next I cut out two of the sections, ending up with the piece you see below.

Before you begin cinching up the thread you need to cut 1/4" to 3/8" down between each section on your berry. This will make it easier to gather. Then carefully cinch up the thread and double knot it before cutting off the excess Linen Thread.


Using 4 Mini Glue Dots, I adhered the leaves to the berry and WALA!!
 Using the Floral Framelits Die, 2nd largest, I cut out my strawberry and then embossed with the Perfect Polka Dots EF. I made my leaves from the Pansy Punch and then began to construct my first berry.
 I folded the Real Red Card Stock in half, all the way around. Next I cut out two of the sections, ending up with the piece you see below.
I refolded this piece in half and punched the 6 sections of the strawberry. I then used the Multipurpose Adhesive and glued the 2 adjacent sections together and formed a preliminary version of the finished berry. Taking a needle and some Linen Thread, about 8 inches, give or take, I whip-stitched through the holes, ending in the same hole I began. BE SURE TO BEGIN IN THE DOUBLED UP PIECE, BECAUSE WHEN YOU CINCH YOUR THREAD, YOU'LL NEED THE STRENGTH OF THIS PIECE!

Before you begin cinching up the thread you need to cut 1/4" to 3/8" down between each section on your berry. This will make it easier to gather. Then carefully cinch up the thread and double knot it before cutting off the excess Linen Thread.

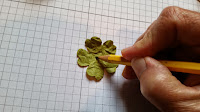
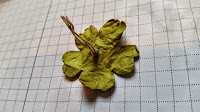
Your berry is almost complete, but you need your leaves to top them off. I used Old Olive card stock, punched it with the Pansy punch and then added texture by first lightly spritzing the leaves with water.
Then I wadded this piece as tightly and gently as I could and then carefully unfolded it. I used pencil markings to guide where I punched 2 small holes that I then put linen thread through, to imitate a stem.

Using 4 Mini Glue Dots, I adhered the leaves to the berry and WALA!!
I made one gold berry and thought this would be the perfect place for a special gift!
Wednesday, May 13, 2015
Tuesday, May 12, 2015
Saturday, May 9, 2015
Birthday Celebrations!!!
Things have changed since I started stamping with Stampin' Up! in 2003. The embellishments have been amped up considerably. I love that, because it just gives such a special touch to my stamping ideas. The new gold sequin trim that came onto the scene just recently is now being accompanied by 2 new colors, as well as the Bermuda Bay. I received my new catalogs yesterday and I'm getting ready to settle in for nice long look at all the upcoming "stuff". You know, the new catalog goes live on June 2nd! Do you have your copy?
Friday, May 8, 2015
Mini Purse
One of the most fabulous demonstrators I know shared a video about how to make this adorable purse so I had to try it! Thanks M.E.! If you want to see more fabulous projects by Mary Ellen, visit her blog at www.createwithme.com.
Thursday, May 7, 2015
My Card for My MIL
Yesterday I posted my card we're giving to MY mom and here is my card we're sending to Bob's mom. I used the same color scheme, same stamp and then changed it up with my coloring and embellishments. It's so great to be able to make 2 cards to send 2 beautiful ladies!!!!
Have a fantasmagorical Thursday and take some time out for just you, even if it's just 10 minutes. You're worth it:)
--Tammie
Built for Free Using: My Stampin Blog
Wednesday, May 6, 2015
Mother's Day for My Mom
Blog Challenge
Well, I was going to enter my first blog challenge, so I printed out all the info a couple of days ago, I knew it ended today, but I neglected to read that I had to have my project in by noon eastern time:( It's all good though. One of my main objectives has been met, in that I have created 2 new cards oh, and I guess there is another goal met...I have my cards ready for Mother's Day. WOO HOO!!
So the challenge was to use 3 colors which were Pool Party, Crushed Curry and Calypso Coral. Seemed like a great project recipe since those are some of my favorite colors.
This card is for MY mom and I think she'll really like it. I tried to think of her personality when I created it and if you know my mom, this fits. Right?
I used stazon black ink to stamp since I was considering watercoloring. I wanted to use the Whisper White Card Stock, for the crispness, so choosing the aqua painter gave me that option so I didn't cause the paper to pile. I diluted the Pool Party for the water in the vases and then I used the markers to color the flowers. I added the stems in the vases with the black marker, since the image only shows part of the stem.
Thanks for stopping by today. Now I need to go mail my card:)
Built for Free Using: My Stampin Blog
Tuesday, May 5, 2015
Friday, May 1, 2015
Bling Butterflies with Flowers
I'm getting ready to head to Spring Into Stamping in Champaign, IL and this is the swap I have come up with. I wanted gentle, Spring and bling. I think this fits the bill. I'm looking forward to seeing all the creations from the girls I love!!
Built for Free Using: My Stampin Blog
Subscribe to:
Posts (Atom)


