
Placement of the platform and die to emboss with the Big
Shot
1.Platform
2.Clear plate
3.Silicone craft sheet
4.Card stock, facing up if using foil
5.Detailed die, cutting edge face down onto the card stock
6.A piece of copy paper-used to protect foil from picking up
marring from clear cutting mat (if using foil)
7.Clear plate
8.Two pieces of card stock for shim (each machine is
different…you may need more, or you may need less)
Run the sandwich through your die cutting machine. The die
will press into the card stock, but the silicone pad should not allow it to cut
through.
NOTE:Top and bottom plates or shims may vary depending on your
machine, but the technique will work with proper pressure if the layers are in
order.
Supplies
Stamp Sets- Birch Background (149256), Tasteful
Textures (149234), Make a Difference (146676)
Card Stock- Crumbcake (120953) 1 piece- cut to 4 ¼” X
8 ½”, scored at 5 ½”. This is your card base.
1
scrap piece for stamping words and sentiment on the inside of
your card.
- Mossy Meadow (133676) 1 piece-
cut to 4 ¾” X 2 ¾”, emboss with Subtle embossing folder (151775).
This will be the mat for your DSP. 1 piece- cut to 2 ¾” X 4”,
emboss with gears die from Garage Gears (148521), then cut with tree die
from Nature’s Roots (146341). 1 scrap piece to layer your
sentiment on the inside of your card.
Specialty Paper- Come Sail Away DSP (designer series paper)
(149481) 1 piece cut to 2 ½” X 4”
Tools- Punches- 2” (133782) and 2 ¼” Circle (143720)
-Die sets-
Garage Gears (148521) and Nature’s Roots (146341)
-Silicone
Craft Sheet (127853)
-Subtle Embossing Folder (151775)
-Paper Snips
(103579)
-Paper
Trimmer (152392)
-Stamparatus
(146276)
-Simply
Shammy (147042)
Adhesives- Dimensionals (104430), Tombow Liquid Glue
(110755)
Instructions
Cut and score crumbcake cardstock. Mark corners of the
inside of your card on Stamparatus grid paper.


Place your card stock on the marked area and stamp with the
Birch background stamp as shown above.


Rotate card 180° and align left edge of inside card
with dots on grid paper. Stamp.
Turn card over and stamp on the front flap of card using the
same background stamp.

Set card base aside and stamp, emboss and cut remainder of
pieces. To make the mat for your DSP emboss the Mossy Meadow piece (4 ¾” X 2
¾”) with the Subtle embossing folder. Adhere the DSP to your mat, aligning it
to the right side, using Tombow Liquid glue.
Applying liquid glue to ONLY the left side of mat, adhere to
card base. With your Mossy Meadow piece (2 ¾” X 4”) emboss and cut your tree.
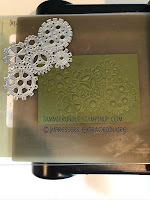
Following the order of layering for embossing with your cutting die (the gears) starting with the clear cutting mat, then the silicone mat. Place your card stock next and then your die with the cutting edge down on the card stock. Follow with the 2nd clear cutting mat and then place 2 pieces of card stock toact as shims on top of all of your other layers. You may or may not need shims or you may need more than one or two. Everyone’s machines are different. Play around and find which number renders the best embossed image.
Arrange your tree die so that the trunk of your tree has no
embossing, cut it out.
Adhere your embossed cut tree to your DSP using
dimensionals.
Finish the inside of you card stamping and cutting “Just
believe” and “You deserve it”. Adhere these on the inside flap of your
card. Then stamp and punch your
sentiment, layer it and adhere it with liquid glue.

