
©Stampin’ Up! has done something they’ve never done before with the soon to be released 2020 Holiday Catalog. They’re bringing back some of our favorites from the 2019 release and I’m ecstatic!! One of those things is the Feels Like Frost Designer Series Paper (DSP). I LOVE this DSP! I could not get enough of it last year and I’m blown away that it will soon become available again, on August 4th!
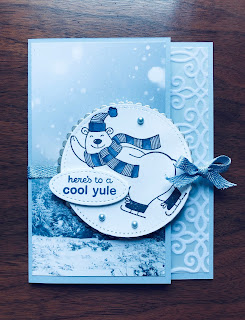
This card is one of my absolute favorites, mostly because of the DSP and the colors. Okay, and maybe I’m crushing on this cute polar bear stamp, too… He’s from the new 2020 Holiday catalog and you can find him in the stamp set, Warm and Toasty. Oh, and did you spot the Flocked Vellum Specialty Paper, Plush Poinsettia, on the right side of the card? Oh my goodness! So many amazing new offerings in this new upcoming catalog!
Let me know if you’d like a copy
of this awe-inspiring, idea filled, mega amazing catalog. I’ll send it to you
so you can drool over it, too!
I’ll list all the ingredients to
make this card, below. Let me know if
you have any questions on anything you see.
Stamp– Warm and Toasty (152615) page 42 Holiday Catalog
Papers– Feels Like Frost DSP (150444) page 42 Holiday Catalog– cut
5 1/4”X 3”
Specialty Paper Plush Poinsettia (153486) page 15 Holiday Catalog– cut 5 1/4” X 1”
Foil Sheets Silver (132178) page
153 Annual Catalog– cut 3” X 3”
Cardstock Seaside Spray (150883)
page 143 Annual Catalog– cut 7 1/2” X 5 1/2”
and score at 3 1/4” on 7 1/2” side for cardbase
Cardstock Whisper White (100730)
page 143 Annual Catalog– cut 4” X 5 1/4”
Inks– Memento Tuxedo Black (1322708) page 146-147 Annual Catalog
Classic Misty Moonlight (153118)
page 143 Annual Catalog
Stampin’ Blends Seaside Spray (154901)
and Misty Moonlight (153108) page 143 Annual Catalog
Frost White Shimmer Paint (147046) page 146-147 Annual Catalog– use with Stampin’ Spritzer (126185) same page
Embellishments– 1/4” Metallic Ribbon Seaside Spray (150446) page 160 Annual Catalog– cut 18”
Pearl Basic
Jewels-3 medium- (144219) page 156 Annual Catalog– color with dark Seaside
Spray Blend
Adhesives– Tear and Tape (138995) page 162 Annual Catalog
Stampin’ Seal (152813)
page 162 Annual Catalog use with
Silicone Craft Sheet (127853) page 162 Annual Catalog
Stampin’ Dimensionals
(104430) page 162 Annual Catalog
Tools– Stitched Shapes Dies- smallest oval and largest circle (152343) page 183 Annual Catalog– use to cut white cardstock
Layering Circles Dies– largest
scalloped circle (151770) page 181 Annual Catalog- use to cut silver foil sheet
Stamparatus (146276) page 164 Annual Catalog– use with Small Grid Paper (149621) same page and catalog
Simply Shammy (147042) page
163 Annual Catalog
Directions
Layer DSP onto front of card base.
Layer Specialty Plush Poinsettia Vellum onto right side of inner card base.
Cut Whisper White Stitched Circle
and Oval and Silver Foil Scalloped Circle.
Place cut white circle on center of Stamparatus. Mark the grid paper with tick mark on top, bottom, left and right sides and place stamp on the center of card stock. Place magnets slightly to the right on the top of the circle and slightly to the left on the bottom of the circle (this will hold your card stock in place as you stamp your bear image). Bring top plate down to attach stamp to the plate, open plate and with Memento Tuxedo Black Ink, ink stamp and then ink your image , onto your card stock. If you want a bolder image re-ink your stamp and repeat.
Spritz your stamped image with the
Frost White Shimmer Paint (fill your Spritzer 3/4 full with rubbing alcohol and
add about 10 drops of paint). This will add some sparkle to your project.
Color your bear’s hat and scarf
with the Misty Moonlight and Seaside Spray Stampin’ Blends.
Attach stamped image to silver
foil using dimensionals. Your cardstock may have curled when you applied the
spritz, so use plenty of dimensionals the keep it flat.
Color 3 medium pearls with the
dark Seaside Spray Stampin’ Blend. Attach to circle as shown.
Stamp and adhere sentiment onto small oval and adhere to white
circle, slightly offset to the left, using Misty Moonlight Ink.
Stamp inside sentiment in Misty Moonlight Ink.
Fold Ribbon in half and using Tear and Tape, adhere ribbon to card front and then layer your stamped circle on top using dimensionals.
Prior to sending your card tie your ribbon into a bow. WALA!
DONE!