Wednesday, November 30, 2016
Ombre Stampin' Pads
I never thought of popping the individual colors out of the pads. Genius! Thanks, Stampin' Up!
Tuesday, November 15, 2016
Here’s to Cheers
Just received my bundle and am excited to try reproducing the samples in this video and then maybe I'll even come up with some of my own ;)
Thursday, November 3, 2016
Wednesday, October 26, 2016
Saturday, September 24, 2016
Monday, September 19, 2016
Wednesday, September 14, 2016
Friday, September 2, 2016
Tuesday, August 2, 2016
Watercolor Wishes Card Kit--Have You Seen It?
I love, love, love this set. I have since the first time I laid eyes on it in the Occasions Catalog, earlier this spring. What? It was in the Occasions Catalog and now it's available in the Annual Catalog?
It sure is (on pages 8-9)! And...I had some time today so I sat down and put it together. That's right, 20 cards, done, today!!
This is where I started...


It sure is (on pages 8-9)! And...I had some time today so I sat down and put it together. That's right, 20 cards, done, today!!
This is where I started...

...and this is where I ended up...

Everything I needed to put this kit together was included in the box: The stamp set, the block to mount the stamps, the dimensionals, inks and bling. All of it! I did use my own Multipurpose Adhesive and Fine Tip Glue pen for the small pieces and the sequins and if you don't have either of those items, check them out on page 182 of the Annual Catalog.
Oh, and if you live in a state that has the tax exempt holiday, be sure to order those things, along with many other items that are tax exempt. Missouri's holiday is August 5-7. Contact me today for more information.
Be sure to include this kit in your next Stampin' Up! order. It's adorable and you can make it just the way the detailed instruction sheet shows or feel free to customize to your heart's content!
Thanks for stopping by:)
~Tammie
Wednesday, July 20, 2016
Paper Pumpkin July 2016
Getting ready to head to my craft room to make these!! Super cute and great way to gift those little "somethings" ;)
Thursday, July 14, 2016
Swirly Scribbles So Versatile


So...the project I came up with was actually inspired by an Independence Day card I saw on Pinterest, and I knew this would be the perfect way to make my gift for a dear friend of mine who has now "fully" retired from his career with the U.S. Army and the school districts for which he served.
This gentleman put in many years in active duty, protecting our right to freedom, and then took on the responsibility of teaching my child, among many, through the JROTC program at our local high school, how to grow while learning about respect, discipline and competing on the Drill Team. He gave countless hours of service through the school week and then traveled on weekends to competitions throughout the Midwest so that our children could grow and learn something that they would not necessarily have ever been exposed.
I love the swirly scribbles in Real Red. They make this piece pop, as do the Night of Navy Stars that were punched using the Medium Star Punch in the Annual Catalog.
I embossed the military pieces from one of my retired sets, in black, matted the 2-sided invitation on Night of Navy and added intermittent white card stock stripes lengthwise throughout the piece.
I carried the military theme into the card and chose to just keep it simple with black and white. The sentiment and soldier are both heat embossed, which gave this card a step up in quality.
Let me know what you think. I'd love to hear your thoughts:)
~Tammie
Friday, July 1, 2016
Birthdays, Love You Lots, and Dapper Denim
 |
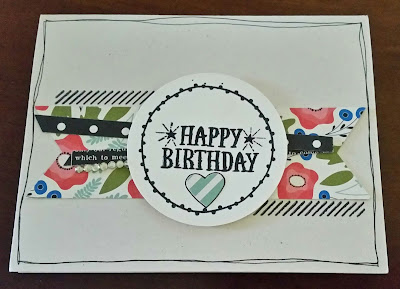
Since this was definitely a celebration of life I wanted to bring the party to the card. These silver sequins and trim were just the ticket. Plus, blinging up the butterflies with the Wink of Stella pen and adding a little "retired" hardware brought the celebration up a few notches;)
I borrowed the birthday sentiment from our Tin of Cards stamp set and added some background attention with Kinda Eclectic.
I know you're visiting this site because you love stamping as much as me, so have fun making your cards and other special projects using these sets, colors and of course, feel free to CASE what you see! Add your twist and feel free to share with me. I'd love to see what you come up with!!
Have a great Friday!!
~Tammie
Tuesday, June 28, 2016
Penned and Painted Using Flirty Flamingo Paired with Pear Pizzazz
Have you seen this stamp set, yet? LOVE IT...
Penned and Painted, page 143, in the new catalog...
The sentiment (from the Occasions catalog that just retired) ...Sunburst Sayings...can be found on page 99 in the annual...
When the new In Colors were revealed at OnStage in Salt Lake City, I LIKED them, but I'm really getting into them, now!! They're just different enough that they stand well on their own and they also pair really well with our base colors.
 Each time I use a new color it becomes my favorite. The Peekaboo Peach was my first fave, and now Flirty Flamingo has moved into first place;)
The way our inks work we can easily get 5-6 shades from one ink pad by stamping off, which is exactly what I did here, with this pretty flower.
You should check these sets out for yourself! The little ladybug is too cute! Let me know what you think and send me pix of your projects:) Have a great day.
~Tammie
Penned and Painted, page 143, in the new catalog...
The sentiment (from the Occasions catalog that just retired) ...Sunburst Sayings...can be found on page 99 in the annual...
When the new In Colors were revealed at OnStage in Salt Lake City, I LIKED them, but I'm really getting into them, now!! They're just different enough that they stand well on their own and they also pair really well with our base colors.

The way our inks work we can easily get 5-6 shades from one ink pad by stamping off, which is exactly what I did here, with this pretty flower.
You should check these sets out for yourself! The little ladybug is too cute! Let me know what you think and send me pix of your projects:) Have a great day.
~Tammie
Sunday, June 26, 2016
Baby Boys are Made with Love


This project was simple, it was really fun to make, and I bet it's a one-of-a-kind that the new mommy will look at time and time again as she thumbs through her little boy's baby book over the years.
Have fun stamping today and I hope to hear from you soon. Share your comments below:)
~Tammie
Friday, June 17, 2016
Love You Lots, Pop of Pink and Hearts


I don't normally "preorder" the Host Sets, because I know that I will get them in the months to come with my parties, but this one (Love You Lots) was a definite MUST for my ever-growing collection of "keeper" stamps. I love all the stamps in this set and the frog was the perfect image for what I had in my mind for my first card using this set. The DSP is Pop of Pink and the bow is tied from the new White Thick Baker's Twine. I used my Aqua Painter and new Emerald Envy Ink Pad to color the little frog and popped him up with a Dimensional. I did fussy cut him, but I don't mind doing that every now and then, although I have to say, with all of the framelits and thinlits that are available, my sizzix machine makes this a "few and far between" event.
The card on the right is the "make and take" we did at my New Catalog Reveal a couple of weeks ago. The strip of white, although not adequately photographed, is actually our Diamonds Glimmer Paper and it was just the right POP that this card needed to take it to the next level. The punch I used was our returning Sweetheart Punch and the embossing folder is Happy Heart.
If you like what you see, leave me a comment, or two. For whatever reason, I haven't seen comments to my posts, so I've gone in and tweaked some things in my settings to help make it easier on you all to post. Hopefully that will help. Thanks!
Have a great Friday and a wonderful, safe and amazing weekend!!
~Tammie
Wednesday, June 15, 2016
Painter's Palette and Pool Party Birthday

As evidenced by the previous cards I made with this stamp set, you can tell it has quickly moved to one of my top faves!

This dimensional card, stamped with Painter's Palette, was really fun to make! This was my daughter's (Shannon) birthday card and I was so pleased with how it came out, I couldn't stop looking at it/shaking it. I'm not kidding! The new Squares Framelits made this super simple and the blingy sequins finished it off just right:) The colors I used were Pool Party and Smoky Slate and to get the dimension I adhered the window sheet first to the card stock and then used our new Dimensional Strips to seal the frame to the easel. Easy Peasy!!!! If you haven't done it yet, order yours today!! Just go to my catalog and click the picture. That'll take you to my website where you can find this stamp, these framelits and everything you need to make this project. Any questions? Just message me. Have a groovy day<3
~Tammie
Saturday, June 4, 2016
Painters Palette and New In Colors are Perfect...

...together!
Are you loving the new CATALOG? What? You haven't seen it yet? Noooooo!!! Get there, now, to check it out and order your new products and get started enjoying the smiles you'll see on your friends faces as they see what you're up to, what you're making and how EASY it is to do what you do!!
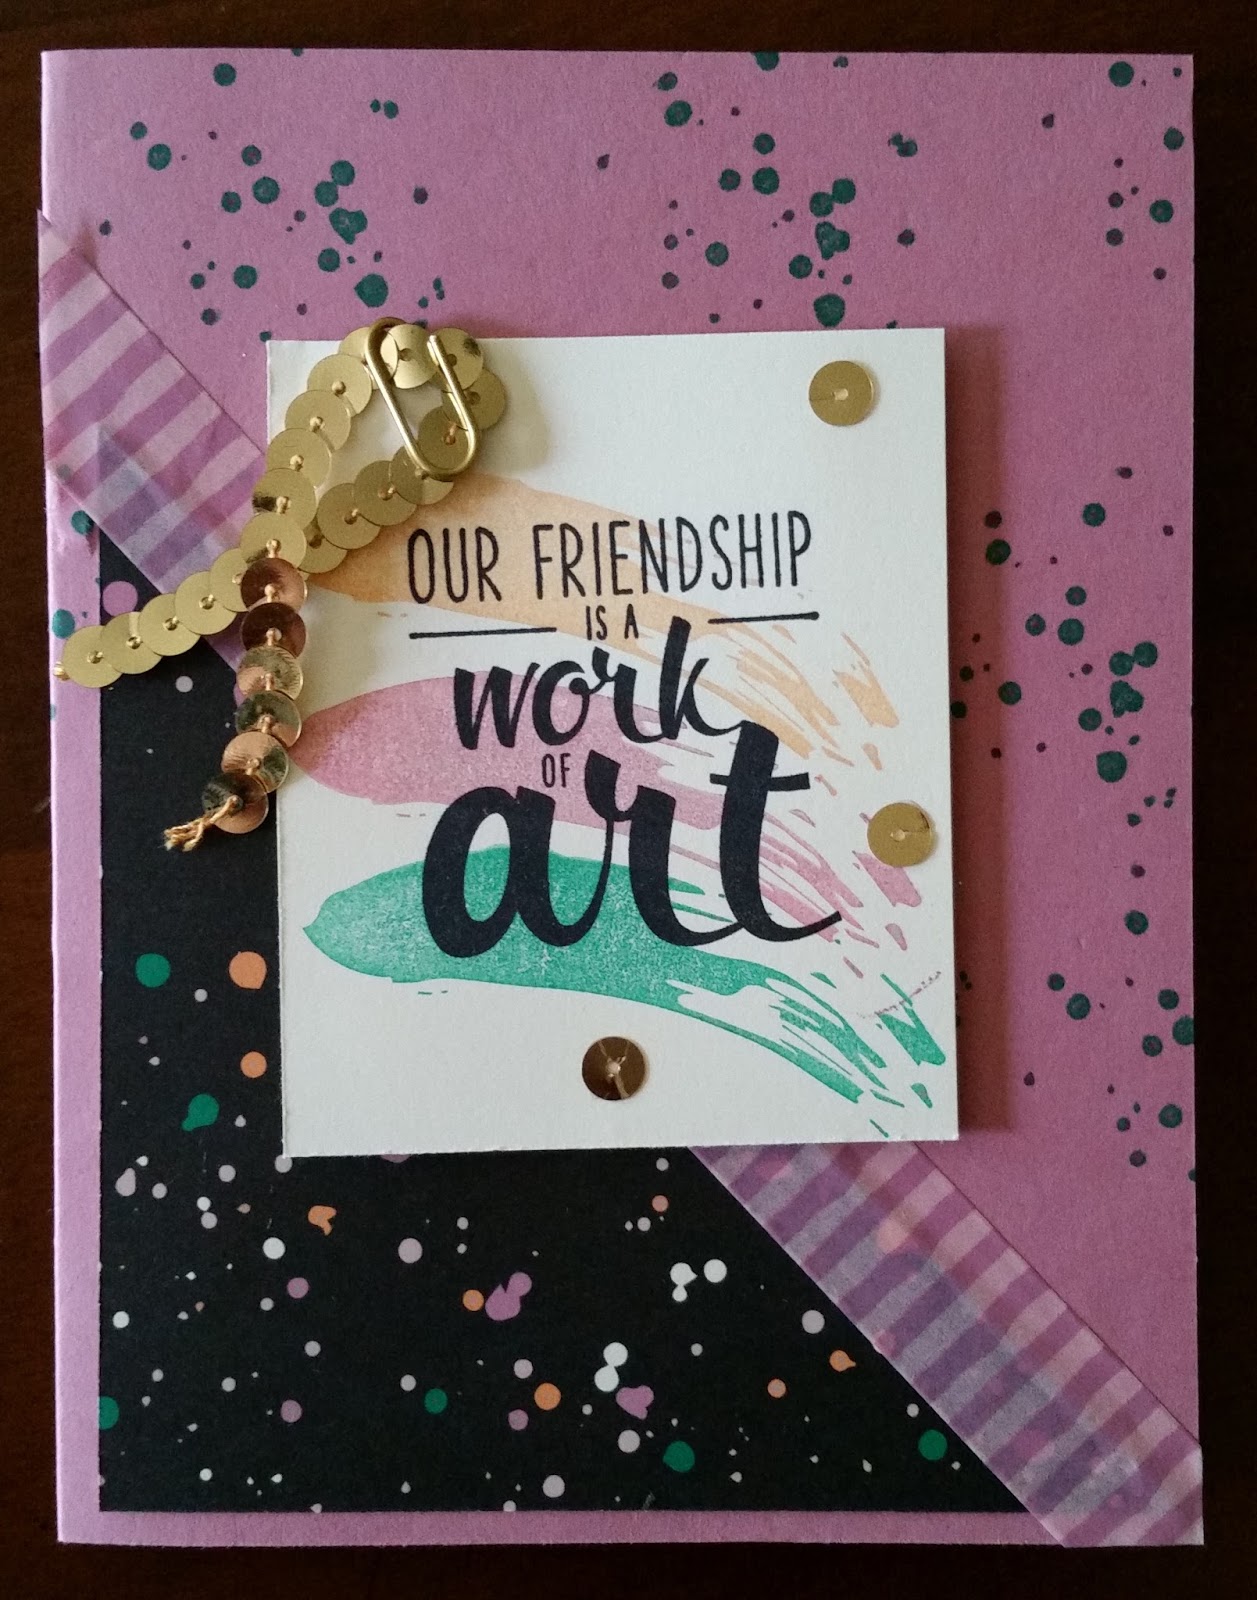
The colors I used on these cards are from our 2015-2017 In Color collection. Peekaboo Peach and Sweet Sugarplum are so beautiful! And look at the Ruched Ribbon, above! This ribbon is so popular that on the very day this catalog went live people gobbled it up like it was candy!! The suite associated with all of the things I used on these cards is called 'Playful Palette'. It fits its name to a T and if you want to view this collection, go to page 118 in this Idea Book...AKA Catalog...and see all there is to play with!
And did you see the little bow clip? Isn't it so cute?! You can see those in the Accessories section of the catalog, on page 177.
Friday, June 3, 2016
My Dad's Birthday


This card was so much fun to make! I received this stamp from the OnStage Local I attended in Salt Lake City, UT in April. Sara Douglass showcased some of her creations using this set which was so inspiring and
 |
| Isaiah's Card |
I really like the colors on this card...Calypso Coral and Night of Navy. Together with the Dazzling Diamonds Glimmer Paper and the stars, not to mention the Silver Sequin Trim and the Wink of Stella Glitter Pen, everything really pops!
Have fun creating with this set and show me what you come up with! I'd love to see YOUR creations!!
Have an awesome Friday:)
~Tammie
Friday, May 27, 2016
#IMBRINGINGBIRTHDAYSBACK
If you haven't seen the incredible movement started by Shannon West, you've missed something REALLY BIG!! But, if you are one of the ones that hasn't been in the loop, the short story is...
Several months ago, Shannon West (a super favorite of mine who works for Stampin' Up! in the home office) started a campaign to "bring birthdays back". If I'm getting this right, Shannon is cool with the FB movement to be able to send that instantaneous message to friends and family, via the internet, but it takes away from the creativity and artistic beauty, not to mention the indescribable feeling we all get when we get that snail-mail from the ones we care about the most. Who doesn't like to go to the mailbox and find something that's actually sent to us for pleasure? So cool to find that envelope nestled among all of the bills and recyclable ads. Right?
So, she created this awesome stamp ( #IMBRINGINGBIRTHDAYSBACK ) and her plan began to unfold. She posted on FB that she wanted to send a birthday card to everyone and to just message our birthdate and address to her and she would make it happen.
Well, how could I not join in and get my very own card from Shannon, a girl I've admired for years? She is so creative, beautiful and her heart is bigger than life!! No brainer...info sent...
Here is my bundle I received in April...

So...when it was Shannon's birthday, I was so inspired by her desire to bring back the actual birthday card, I had to create and send HER some of my heart and soul.
As I sat down to create I tried to think about her favorite colors, stamps, and what she might like to see on a card. I only know her from her presentations at the different events I've attended and her online videos of inspiration, so I hoped I was guessing right. Not really sure if this is one of her favorites stamps, but it's one of mine, so, without further ado, here is my creation for this gracious lady...


Several months ago, Shannon West (a super favorite of mine who works for Stampin' Up! in the home office) started a campaign to "bring birthdays back". If I'm getting this right, Shannon is cool with the FB movement to be able to send that instantaneous message to friends and family, via the internet, but it takes away from the creativity and artistic beauty, not to mention the indescribable feeling we all get when we get that snail-mail from the ones we care about the most. Who doesn't like to go to the mailbox and find something that's actually sent to us for pleasure? So cool to find that envelope nestled among all of the bills and recyclable ads. Right?
So, she created this awesome stamp ( #IMBRINGINGBIRTHDAYSBACK ) and her plan began to unfold. She posted on FB that she wanted to send a birthday card to everyone and to just message our birthdate and address to her and she would make it happen.
Well, how could I not join in and get my very own card from Shannon, a girl I've admired for years? She is so creative, beautiful and her heart is bigger than life!! No brainer...info sent...
Here is my bundle I received in April...


So...when it was Shannon's birthday, I was so inspired by her desire to bring back the actual birthday card, I had to create and send HER some of my heart and soul.
As I sat down to create I tried to think about her favorite colors, stamps, and what she might like to see on a card. I only know her from her presentations at the different events I've attended and her online videos of inspiration, so I hoped I was guessing right. Not really sure if this is one of her favorites stamps, but it's one of mine, so, without further ado, here is my creation for this gracious lady...


The black and red were kinda no brainers, and I definitely wanted to add bling. I used the Wink of Stella to color her bow, nose, honey and to do some of the shading and I colored some Crystal Effects (which happens to be retiring this month) with the Real Red Ink Refill and painted it on the Rhinestones with an old Aqua Painter. Her red belt is decorated with the Red Dazzling Details (which is also going away).
Today I saw a video on YouTube that Shannon had posted with the 954 birthday cards she has received to this day. I actually saw my creation toward the end of her video. WOW!! Very awesome!!!
I'd love to know what you think! I really like how my card turned out and of course, I had to stamp with Shannon's creation, #IMBRINGING BIRTHDAYSBACK.
Have a great Friday and a safe and spectacular holiday weekend! See you back here soon :)
~Tammie
Tuesday, May 17, 2016
June is YOUR month to HOST a party!!!

June is an epic month for you when you host your party!! Have you seen your wishlist? Want to get some of those things for FREE? Contact me today to do that!
Tuesday, May 10, 2016
Masking--Sitting Here Stamp Set
The new catalog is just weeks away from its premiere!! Here is a video showing the masking technique using one of the new stamp sets that you can possess just by having a qualifying party in June:) Contact me today to get your party on my schedule
Tuesday, April 19, 2016
RETIRING!!
 |
| CLICK HERE TO ORDER |
Can you believe it's been a whole year since we met this catalog? WOW! Where did THAT time go? No worries, though...there's still time to get those things on your wishlist before they're gone forever.
Be sure to order SOON and order often. Get IT ALL;)
I'm looking forward to the NEW coming in, but LOVE the OLD, too. See you soon, gotta go make my shopping list:) ~Tammie
Saturday, April 2, 2016
Bear Hugs by Janice
Several months ago I posted a Christmas card that I had created using the adorable set, Bear Hugs. When I received this stamp from the Prize Patrol at OnStage Local in November I was tickled pink! When I saw this set come up as one we could win I had this undying hope that I would have the right color to win...and win, I did!!!!!!!!!!!!!! Oh my gosh...to win prize patrol is so magical. Jan won a Prize Patrol, too. How cool is that?!
 I had gone to OnStage with my sis (in-law), Janice Druez, and we had a blast. Jan was so excited for me that she sent me the coordinating framelits for my Christmas gift. Awww!!!
So I started creating and will definitely keep this bundle in my "forever" collection. With that being said, I am celebrating my birthday on Monday and in the mail yesterday was a card from Jan using, you guessed it, Bear Hugs.

 It is so adorable and I just have to share it with you! Without further ado, here is my birthday card from my sis, Jan...
Thank you, Jan and Patrick for making my birthday celebration even more special. Getting a handmade card takes it up several notches. Don't you agree? :)
Have a great weekend!
~Tammie
 I had gone to OnStage with my sis (in-law), Janice Druez, and we had a blast. Jan was so excited for me that she sent me the coordinating framelits for my Christmas gift. Awww!!!
 So I started creating and will definitely keep this bundle in my "forever" collection. With that being said, I am celebrating my birthday on Monday and in the mail yesterday was a card from Jan using, you guessed it, Bear Hugs.
 It is so adorable and I just have to share it with you! Without further ado, here is my birthday card from my sis, Jan...
Have a great weekend!
~Tammie
Thursday, March 31, 2016
Birthday Inspiriation


However, this stamp, particularly the cake, was always in the background of my creative mind. I HAD to conquer this conundrum!
I DID IT! At least in my mind I did. DSP!! So, recently I was designing cards for my 'Cards for a Cause' event and I wanted all the cards to be birthday. Guess which stamp crept into my mind...AGAIN?! You got it...Party Wishes. I was determined! Then it hit me. Stamp on the back of the It's My Party DSP and fussy cut this darn cake. I knew fussy cutting for this event would not be foreboding since it was all straight lines so I was not intimidated by this potential hitch. Away I went...
Here's the final product and I really think it turned out cute! I blinged up my card with the Clear Wink of Stella Glitter Pen (pg 24 in the Occasions Catalog/OC) and Dazzling Diamonds Glimmer Paper and added detail and dimension with the Curvy Corner Trio Punch (pg 31-OC) and the Decorative Dots Embossing Folder (pg 174 in the main Idea Book).
Enjoy creating your birthday cards and have fun figuring out how to use that cake;)
Have a groovy day!
~Tammie
Wednesday, March 23, 2016
Sara Welcomes Shelli Back
This is BIG news!! I think as the time passed, with Shelli and Sterling on mission in Hawaii, we were all extremely impressed with the direction of Stampin' Up! as Sara stepped into her new role as Interim CEO of Stampin' Up! So, although it is now official, as of yesterday (March 22, 2016), Shelli's announcement of Sara becoming the new CEO of Stampin' Up! was not a complete surprise. CONGRATULATIONS #SaraDouglas ! You are an amazing leader and I'm looking forward to where you take this business.
Friday, March 11, 2016
Sunset Retirement with Serene Silhouette Stamp Set
 Good Friday morning! I was asked by a friend for a gift certificate for her friend as she wanted to give a retirement gift. Now, I couldn't just give her the certificate...could I? I definitely wanted to envelope the gift in an appropriate wrapping...one that was fitting for the occasion, right?! Right! Here's the card I came up with, and I felt the sunset was very fitting for this. I saw this technique on Pinterest from a fellow stamper, Karen Titus. You should check out her technique!
So to get the effect on this card you will need a piece of Whisper White card stock and one of your clear blocks. Next, choose markers that will give you the color scheme you desire. I chose Melon Mambo, Pumpkin Pie, and Daffodil Delight Stampin' Write Markers for the sunset colors and Island Indigo, Marina Mist and Soft Sky Stampin' Write Markers for the blue sky. The stamp set is Serene Silhouettes.
Begin coloring strips of various widths onto your clear stampin' block and when you're finished coloring, spritz with water (or alcohol). Let your colors flow together and then stamp onto your white card stock. Once this has dried, stamp the trees, using Stazon Black or Archival Black ink.
Add your card back and embellish as you wish. I used the Wink of Stella Glitter Pen to put a little "dazzle" aroung my card and on the sentiment and trees:)
Have a great day!!!
Thursday, March 3, 2016
Tuesday, February 23, 2016
Rose Wonder with Stained Glass Technique is Beautiful!


The supplies I used for this project were card stock- Pool Party and Whisper White; Glimmer Paper-Dazzling Diamonds; Vellum; Jewels-Rhinestones; Stampin' Write Markers- Blushing Bride, Pear Pizzazz and So Saffron. I embossed the Pool Party piece with Gently Falling EF and my adhesives were the Fine Tip Glue Pen, Stampin' Dimensionals and Multipurpose Adhesive. My stamp set was Rose Wonder and the coordinating thinlits were Rose Garden (page 18 of the Occasions Catalog). After I cut the rose outline from the Glimmer Paper using my Big Shot with my Magnetic Platform I ran the new Big Shot Die Brush from the Occasions Catalog (pg 19) over the paper and it came out easy peasy. As a side note, when I run intricate dies through my machine I make 3-4 passes to get the best cut possible.
For the Stained Glass Technique, you simply layer your glimmer paper outline, your pool party template and the vellum together and then, turn your piece over and color on the back of the vellum, using your rose outline as your coloring guide. When you're gluing the glimmer paper to the vellum it takes a little longer to adhere, so just wait a little longer than normal and you're good to go. Since this piece is so intricate using the Fine Tip Glue Pen is a must. So easy and so cool!! Once I had the card designed I assembled the artistic piece on top of the base card using dimensionals (very liberally) so my design was lifted off the base, giving it the look I was after.
Let me know what you think:) I'd love to hear from you!
~Tammie
Friday, February 19, 2016
My Mom's Card HAD to be Beautiful!!!


Of course I had to use the Blushing Bride Glimmer Paper to make my butterflies because they needed to match my outlined rose and then I wanted to put a little love on the card using the Confetti Hearts Border Punch layered onto the same DSP and a piece of Basic Gray under that. The sentiment and outline border are part of the same stamp set and the thinlit to cut out the sentiment is included in the set with the rose.
I'd love to know what you think! Please message me if you like. Thanks!!! Have an awesome Friday.
~Tammie
Wednesday, February 10, 2016
Housewarming
I was reminiscing today as I sorted through the cards I've made, both recently and in the past. I really like the "happy" card below. I was approached by a friend to make a card for her good friend


Red is my favorite color and look at these two cards. Although they are two different shades of red, one "real red" and the other "watermelon wonder", they're still red. Hmmm.
The lower card is my most recent housewarming card I made and I really like the unexpected window frame looking out on the neighborhood. The weather in our neck of the woods is indicated very well by this card so I just went with the snowy look. Let me know what you think:) Thanks for stopping by!
~Tammie
Monday, February 1, 2016
Grandchildren, Birthdays and Cardmaking...I Love the Possibilities!!


Our granddaughter, Maddy, turned 7 a few days ago and she loves the color pink. I chose to use Rose Red since it's a "hot" pink color and it matches the new 'It's My Party' Enamel Dots in the Occasions catalog. Have you seen the catty? I swear it's the best of the best that Stampin' Up! has ever put out!!! I want to get (and use;) every item in there!! The embossing folder 'Confetti' on page 5 is too cute. Oh, and the numbers framelits...on page 10...where have they been all my life?! Not to mention you can bundle these framelits with the Number of Years stamp set and you are good to go for all kinds of projects!! Check it out!
So I knew I wanted lots of texture, layering and fun things that would catch a 7 year old's attention so I layered my glimmer paper 7's using the Dazzling Diamonds and Blushing Bride glimmers and then stuck them to my clear embossed Vellum that I had inked in Rose Red. I used the cake stamp from Party Wishes on page 5 as well as the Happy Birthday and A Little Something Sentiments.
I couldn't ignore the little cupcakes in that set and the coordination with the Party Punch Pack made it uber duber easy to create these little embellishments!!
I am usually in too big of a hurry to decorate my envelopes, but this was Maddy's card and I wanted it to be sooo special so I cut the liner using the Envelope Liner Framelits on page 173 of the main catty from the Love Blossoms DSP on page 17, using the middle die to coordinate with the Notecard and Envelope I chose to use. It's petite and just the right size for my munchkin Maddy.
I had fun creating this card and look forward to sharing more soon:) Have a great Monday!!
--Tammie
Friday, January 22, 2016
Friday, January 15, 2016
Bermuda Bay and Rose Wonder, Simply Beautiful!

I didn't photograph the inside of the card, but I used the 'Thank You' from the same set, Rose Wonder, as I used for my message on the front of my card. Such an elegant font, and many ways to use this set!
I'm looking forward to exploring new and different ways to use this timeless stamp set. I would love to see some things you are making with it, also! Send me a note:)
Have an awesome Friday night!!
--Tammie
Wednesday, January 13, 2016
Chick in Honeycomb Happiness is Adorable!!

I stamped this cute little chick in Stazon onto the thick Whisper White Card Stock (CS) and watercolored him in Pool Party Classic ink, using my Aqua Painter. I colored his beak and feet with my Crushed Curry Stampin' Write Marker. I layered my chick onto a banner punched from the regular Whisper White Card Stock with the Scalloped Tag Topper Punch that I ran through my Big Shot Machine using the Tiny Triangles Embossing Folder and then onto a piece of the Perfectly Artistic Designer Series Paper (SAB) stamped with Timeless Textures from the Occasions Catalog (OC) using Daffodil Delight Ink. Oh, and in case you aren't aware, the coordinating colors for all of the Designer Series Paper (DSP) are listed on the back of the DSP package making it very easy to match and contrast our creations:) The salutation is stamped on Basic Black CS using Whisper White Craft Ink and then I finished the card with a Daffodil Delight card base.
Leave a comment if you like this. I would love to hear how I'm doing:)
Have a great day!
--Tammie
Monday, January 11, 2016
Valentines Stampin' Up! Style


I found the design of these cards in the 2016 Occasions Catalog, but didn't have the same Designer Series Paper as was used, so I found the next best one, Birthday Bouquet. One of the most common themes/reasons people say they don't want to be a demonstrator is that they are "not creative". I completely understand this thought. When I began stamping with my sister many moons ago I felt like I had not a creative bone in my body. I joined her stamp club to find out how to use the products, but I felt like her "creations" were always WAY better than mine. Sound familiar? As the years have passed I've become aware that we all have the potential to be creative. If you've ever watched a child you know that creativity abounds in them, whether it be with music, coloring, creating games to play, etc. I feel we all have the innate ability to create. It's one of those gifts we are given in life. What I've also found is that through daily regimens of work, appointments, getting our children to and from their various activities, making sure that personal relationships are cared for, our homes are cared for, and on, and on, and on, a lot of time we lose that sense of self, of who we are and what we're about. It's almost like we're set on auto-pilot just so we can get through one day, and onto the next. We get into the mode of chasing after our dreams instead of realizing we are actually existing in our dreams, creating our dreams, swimming in our dreams. With that being said, once I realized this, I set out on a lifelong journey to focus on the moment, to revel in the experience of the moment. My creativity is very much present. It may not always be what I feel it should be, but that's something I'm still working on. It's okay to NOT be able to "create" all the time. With all of the creative minds in our world it's important to share and consume ideas. We must feed our need. At the end of the day, know that it is always okay to realize someone else's idea and run with it, tweak it, share it. It's all good. Enjoy your moments and the creativity will flow:) That's my thought for the day. Enjoy your gift of creativity. --Tammie
Subscribe to:
Posts (Atom)